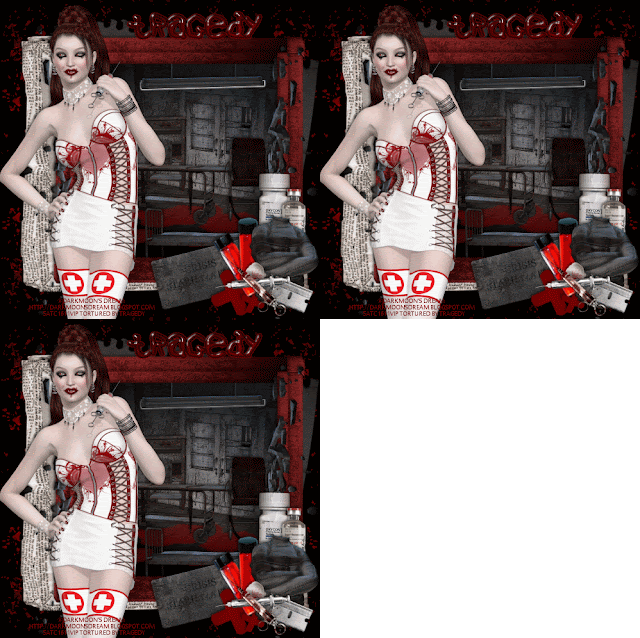
Nurse Bettie Sue tube by Dark Moon's Dream. Get it at SATC.
FTU kit called the Ward by Irish Bitch Designs. Get it from HERE.
Eyecandy 4000 Gradient Glow
Animation Shop.
Font: Valium
Open a new image size 500 by 500.
C/P Paper Cluster. Resize by 65%. Dropshadow.
C/P Frame 1. Resize by 60%.
Select the inside of the frame with your magic wand. Selections, Modify, Expand by 3.
Add a new raster layer under the frame. C/P Paper 2 into selection. Deselect.
C/P Light. Resize by 50%. Dropshadow. Position as desired under the top part of the frame.
Use your selection tool to remove any part of the wire that is above the frame.
Duplicate the light layer. Apply Gradient Glow of 3. Using your selection tool select from the middle part of the light up. Hit delete to remove the excess gradient glow. (You can skip this part if your will not be animating.)
C/P Blood. Resize by 50%. Change the layer opacity to about 60%.
C/P Table. Resize by 20%. Dropshadow. Position to the left of the doors. (Be mindful it is sitting on the "floor" of the paper.)
C/P Gurney. Resize by 30%. Dropshadow. Position just above the lowest shelf on the table.
C/P Wheelchair. Resize by 20%. Dropshadow. Position over the right side of the gurney.
C/P Bed. Resize by 30%. Dropshadow. Position so the foot of the bed is near the lower right corner of the frame.
Dropshadow frame layer.
C/P Rubble. Resize by 75%. Image, Rotate, Free Rotate 90 degrees. Dropshadow. Duplicate. Position over each side of the frame.
C/P Huggy Jacket. Resize by 20%. Dropshadow. Position over the lower right corner of the frame.
C/P Painkillers. Resize by 15%. Dropshadow. Position just under the top of the huggy Jacket. Change the opacity to 80.
C/P Meds. Resize by 20%. Dropshadow. Position over the painkillers just under the top of the huggy jacket.
C/P Sign. Resize by 30%. Dropshadow. Position towards the middle of the bottom of the frame using your deform tool.
C/P Razor. Resize by 15%. Dropshadow. Use your deform tool to position over the bottom of the huggy jacket.
C/P Bandages. Resize by 10%. Use your deform tool to position over the bottom right corner of the sign.
Duplicate Bandages. Resize by 50%. Image, Mirror. Position to the right of the original.
C/P Vial 1. Resize by 20%. Image, Rotate, Free Rotate 90 degrees. Dropshadow. Position just under the left side of the huggy jacket.
C/P Vial 2. Image, Rotate, Free Rotate 90 degrees. Dropshadow. Use your deform tool to position at a slight angle over the sign.
C/P Equipment. Resize by 30%. Dropshadow. Position over the bottom of the vials.
C/P Scatter. Adjust, Color Balance, Manual color correct. Select your source as the color of the scatter, Target to blood red.
Resize scatter by 50%. Dropshadow. Position under the bottom left of the paper cluster. Duplicate & Flip. Merge down. Duplicate & Mirror.
If you are not animating add your name and your are done. This is what your tag will look like...
If your are animating...
Add a new raster layer. Flood fill black. Move this to the bottom of your layer palette.
Go to edit, Copy Merged.
Paste into animation shop as a new layer.
Back in PSP change the opacity on the light glow layer to 80. Copy Merged.
Paste into animation shop as a new layer.
Back in PSP change the opacity on the light glow layer to 60. Copy Merged.
Paste into animation shop as a new layer.
Select frame 1 on your animation. Go to edit Select all.
Go to edit & Make sure Propagate paste is selected.
Back in PSP type out your font. Apply Eyecandy 4000 Gradient Glow of 2 Fat in black. Dropshadow.
C/P your name only into animation shop.
Drag your name to the first frame of the animation.
View your animation. If your name blinks your forgot to hit propagate paste. Hit the back button on both the animation & your name and repeat the about steps.
Don't forget your copyright and watermark!


Awesome! Thank you so much, hun. :D
ReplyDelete